
Simple Sudoku puzzles in magazines or puzzle books can be solved by beginners or advanced players alike by simply following the rules and applying a little logic. However, more difficult Sudoku puzzles often require us to use advanced strategies to find a solution. One such advanced or difficult technique in Sudoku is the X Wing.
In this article, I will explain how the X Wing works. Before we get started, however, we need to remember two things in order to really understand this strategy.
First, we have to remember the rules. We can summarize them briefly as follows:
Each number from 1 to 9 must appear exactly once in each row, column, and block.
In addition, in many advanced Sudoku strategies the candidate notation is very important. This involves writing all possible numbers in small letters or pencil in the empty cells that are candidates for these cells. This method greatly simplifies the application of many other methods.
If you are generally interested in many Sudoku strategies, you are welcome to take a look at my book on this topic. All solution methods are explained there using examples.
How does the X Wing work in Sudoku?
The X Wing itself is not hard to understand. The biggest problem is recognizing such a situation in the first place. Depending on how many cells are still unsolved, it can be very difficult to recognize an X Wing in Sudoku.
To introduce this technique, let’s first look at a sketch. In the following image, the A is a placeholder for one of the numbers between 1 and 9. These numbers are not yet solved here, but are only possible candidates.
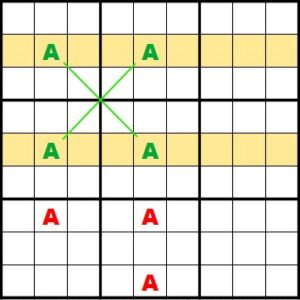
Let’s assume that in the second and fifth rows, the green A is the only A that can appear as a candidate in these two rows. In all other positions in these two rows, we can exclude the A as a candidate.
Due to the Sudoku rules that each number (from 1 to 9) must appear exactly once in a row, we must enter the number represented by the A in exactly these positions. Either at the front of the second row and at the back of the fifth row – or exactly the other way around.
If this is the case, the A also appears in these two positions in the second and fifth columns, where they are also located. In the image above, the red As represent additional digits A that are possible candidates in these two columns. However, since the A cannot appear a second time in these two columns due to the Sudoku rules, we can cross it out there.
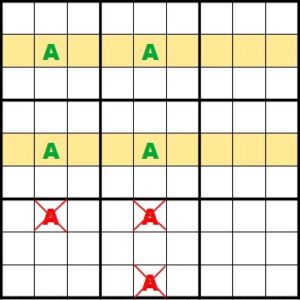
This simplifies the situation, as we now have fewer candidates to consider. In the best case, only one candidate remains in a cell and we can enter it there permanently.
In general, we can summarize the logic behind the X Wing as follows (two variants):
- If a number from 1 to 9 appears in two rows in exactly two columns (the two same columns), the same number can be removed from all other places in these columns.
- If a number from 1 to 9 appears in two columns in exactly two rows (the two same rows), the same number can be removed from all other places in these rows.
Example of the X Wing
The above explanation was very general and did not refer to a real game situation. So let’s now look at how we can apply the X Wing in practice to a real Sudoku puzzle. An example always helps with understanding.
Let’s look at the following situation. I have already entered the possible candidates in the unsolved cells.
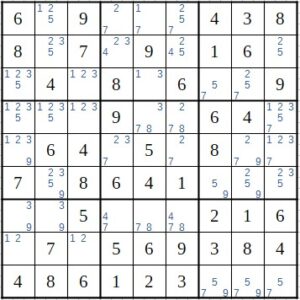
If you want, you can try to find the X Wing in this situation yourself. A little hint: It is in the third and fifth columns. We can see this more clearly in the next image:
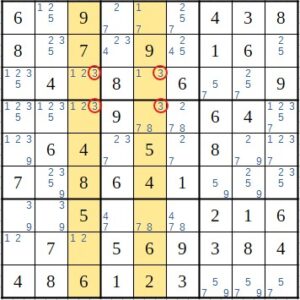
We look at candidate 3 here. It only appears in two different places in the third and fifth columns, and in each case in the same place. In both cases, the 3 appears in the third and fourth cells from the top, respectively, and nowhere else in these two columns.
Since the 3, like every other number, must appear exactly once in each column, the 3 will ultimately appear in two of the four marked positions. Either in the third column at the top and in the fifth at the bottom, or vice versa.
This means that the threes also appear in exactly these two positions in the third and fourth rows. And since the 3 can also only appear once per row, we can cross it out in all other positions in these two rows.
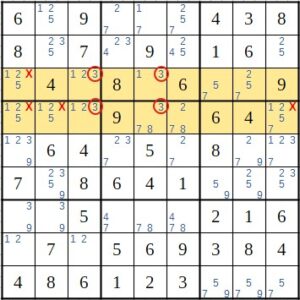
This is the case in a total of four positions, as we can see in the image above. In the third row, we can remove the 3 in one position, and in the fourth row, we cross it out in three positions.
Conclusion
The X Wing can be a very helpful Sudoku strategy when we get stuck using the simple methods. It is very important here to first enter the possible candidates in all empty cells. Without this candidate notation, it is difficult to almost impossible to recognize some patterns at all.
There are two other solution strategies that work according to the same logic as the X Wing and are based on it, so to speak: the Swordfish and the Jellyfish.
In the Swordfish, we have three rows and columns (maximum) instead of two, and in the Jellyfish, we have a maximum of four. However, these two situations are extremely rare and you will hardly ever encounter them in a normal Sudoku puzzle in magazines. The X Wing, on the other hand, is also rare, but the probability of it occurring in a puzzle is higher.